

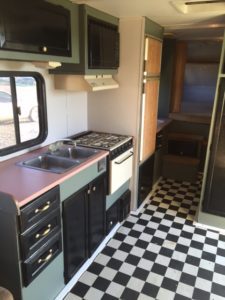
Anyone who knows me, knows I love a good DIY project. I’m so excited to share my new found love for wide-plank plywood floors with you. When renovating our toy hauler, my husband and I had to come up with a solution to our flooring problem. There were holes that once housed a table, and overall the flooring could use more support for the motorcycles that would be stored in there. We decided that wide-plywood floors would solve both those issues, and we loved the look of it. The price wasn’t too bad either. Here’s how we did it!
What you’ll need:
- ¾” High-Quality Plywood
- Miter Saw
- Table Saw
- Jig Saw
- Nail Gun
- Speed Square
- T-Square
- Finish Nails
- Fine Sand Paper Sponge
- Measuring Tape
- Stain
- Wood Polyurethane
- Mineral Spirits
- Oil Specific Brush
- Cheesecloth
- Lots of patience
We chose to go with the highest quality plywood available at Home Depot. This way there was less sanding and preparation on our part and a better-finished look in the end. Each sheet cost $49.00 and worth every penny. We then had each sheet cut to 12” at the store.
First, it’s best to decide a starting point. Typically this is done by finding the center of the room and going from there. In our case, the flooring would also act as support to the motorcycles we will be storing in the trailer. Therefore, we decided to overlap the seams from the original plywood floor to create a stronger foundation.
Time to start cutting! Using our miter saw. We measured and cut the each piece to length. If the pieces needed extra cut-outs we would do that after the length was cut. This is when the speed square and T-square become handy. After all of your cuts are made give the plank a good sanding with the fine sand paper sponge.
Note* Make sure when making cut-outs to be aware of which end to measure from. We made this mistake a couple of times.
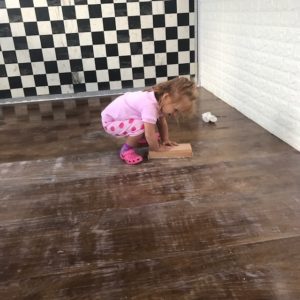
We would cut 6 at a time and then line them up to be stained. I chose to do this before nailing the pieces in so that way it didn’t matter how messy I was with the stain made and it made coating the edges much easier.
As soon as the floor planks were dry enough to handle, we nailed them down.
Cut, Sand, Stain, Nail, Repeat!
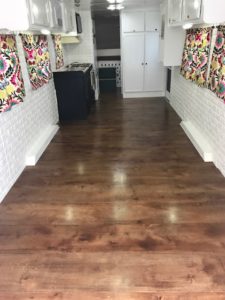
After all of the pieces are installed, give the flooring a detailed cleaning.
Next, we deluded the polyurethane down by 1/3 with mineral spirits in order to achieve a smoother finish. Applying the polyurethane can be tricky but I suggest soaking the brush in the mixture and gently gliding in over the wood. Do not try and squeeze the excess polyurethane out of the brush or you will create bubbles.
Note* Reducing the polyurethane with mineral spirits extends the drying time.
About 24 hours after the first coat of polyurethane was applied we gave the floor a gentle sanding, thoroughly cleaned any dust we created with the cheesecloth. Finally, we applied the second coat. The manufacturer suggests a minimum of two coats for floor use, and about 14 days for total cure time.
Review:
We ventured to Lake Powell to try our new camper and after lots of sand and two toddlers running around, the floors held up great!


")
